I’ve been cooking for years and have learned some tips and tricks to save time and money while working in the kitchen. This list of my tried and true 10 Best Kitchen Hacks will make you scratch your head and say, “Why didn’t I think of that?”

I’m excited to share these useful tips and tricks I’ve learned over the years. They make my life easier in the kitchen and I know they’ll do the same for you. Some were born out of necessity and some were handed down to me from the many great cooks in my family. Take a look and please comment with YOUR favorite kitchen hacks, I’m excited to hear what’s working for you in the kitchen!
#10- What can I substitute for buttermilk?
Often times a recipe for bread, biscuits or cake will require buttermilk. I usually discover this just as I decide to make a recipe and I don’t have time to run to the store. And I typically don’t keep buttermilk on hand. So, what can you do? Make your own! Here’s how to do it.

Pour 1 cup of milk into a small glass container. I prefer to use a measuring cup to make it easy. Add one tablespoon of white vinegar (or fresh lemon juice). Stir to combine and allow to sit for at least 5 minutes. The acidity in the vinegar will begin to curdle the milk, making buttermilk. If you don’t have any milk on hand, you can also use one cup of plain yogurt as a substitute for the buttermilk.
#9- How to easily cut (and catch) corn off the cob?
Those of us who freeze corn for the winter know all too well how messy it can be to cut kernels off the cob, only to have most of it hit the counter or the floor. How frustrating! This hack to get it neatly in one pan will save you time and tears over spilt corn.

Use a Bundt pan and a sharp knife to get your corn to stay put! First, peel the ear of corn and remove the silk. Using a sharp knife, cut the stem end so that it is flat. Rest the flat end of the corn cob on the inside edge of a Bundt pan. Use your knife to cut the kernels cleanly off the cob and watch them easily fall into the pan. A standard Bundt pan holds several ears of corn, so there is no need to stop to scoop the corn into bags until the pan is full. No need for cleaning up a big mess. It works every time!
#8- Use a mason jar ring as a cookie cutter.
There are so many uses for simple kitchen items. I have often used things I find in my kitchen when I don’t have a certain tool I might need. When I first began baking, I used a drinking glass in place of a rolling pin when making cookies. I never gave this substitution a thought, since it is also how my grandmother rolled out her cookies. It was handy and didn’t take up extra space in my kitchen drawer.

Likewise, I have used the metal rings from mason jars in a number of ways for a variety of reasons. Most commonly, I use these rings as cookie cutters when making holiday sugar cookies. Simply roll out the cookie dough, dust the ring with flour and cut out your cookies. I’ve also used mason jar rings for shaping pancakes in a pan and cooking a perfectly round egg to fit on an English Muffin. Don’t you just love mason jars…and their lids? I do!
#7- Use a wooden spoon to prevent a pot from boiling over.
This one surprises me every time I do it. How can something this simple makes such a significant difference in the kitchen? Because it saves you from having to clean your stove each time a pot of soup or pasta water boils over. And it WORKS!

Simply rest a wooden spoon across the edge of a boiling pot and when the mixture gets to the top, the spoon keeps it from going any further. It is, of course, best to keep an eye on anything cooking on the stove, but this hack really works if you have to step away for a quick moment.
#6- Use butter wrappers to grease a baking dish.
Most recipes require you to spray a baking sheet or pan with cooking spray before baking. Those same recipes often require at least one stick of butter. Save the wrapper from the butter and use it to grease your pan.

Simply rub the inside of the butter wrapper on your baking sheet prior to portioning cookie dough or adding cake batter to a pan. This is a money saving tip that takes advantage of those bits of butter left behind on the wrappers. Win, win!
#5- How to repurpose those apple peels?
When baking each fall, I often have an abundance of leftover apple peels. So, what can you do with them? Don’t throw them away! They are full of sweet fall flavor. And there are a variety of ways to use them in drinks and dishes. Until you are ready to use them, place them in a gallon zip-lock bag and squeeze a tablespoon of fresh lemon juice in the bag. Seal the bag and put it in the refrigerator.
One of my favorite ways to use apple peels is by putting them in a pitcher of white wine and letting it sit in the refrigerator for a few hours. This makes a tasty white Sangria! Add some additional fruit and lemonade, if desired, or even some sparking water, and you’ve got a flavorful glass of wine for dinner.

I also like to add apple peels to the blender when making smoothies in the morning. The peels will give your smoothie some natural sweetness! Simply puree them with the rest of your smoothie ingredients…a delicious way to start your day.
Finally, you can make apple simple syrup with them. Place the peels from 4 medium apples in a medium saucepan, then add 3 cups of water, 1 cup of sugar and a cinnamon stick. Bring the mixture to a boil, reduce to low heat and simmer for 15 minutes. Remove the pan from the stove, cool it completely and remove the peels and the cinnamon stick. Pour the syrup into a mason jar and seal it with a lid. Store it in the refrigerator until ready to use, up to one month. Drizzle the apple syrup on pancakes, waffles or stir it into hot tea. It can give extra fruit flavor to many of your fall drinks and dishes.
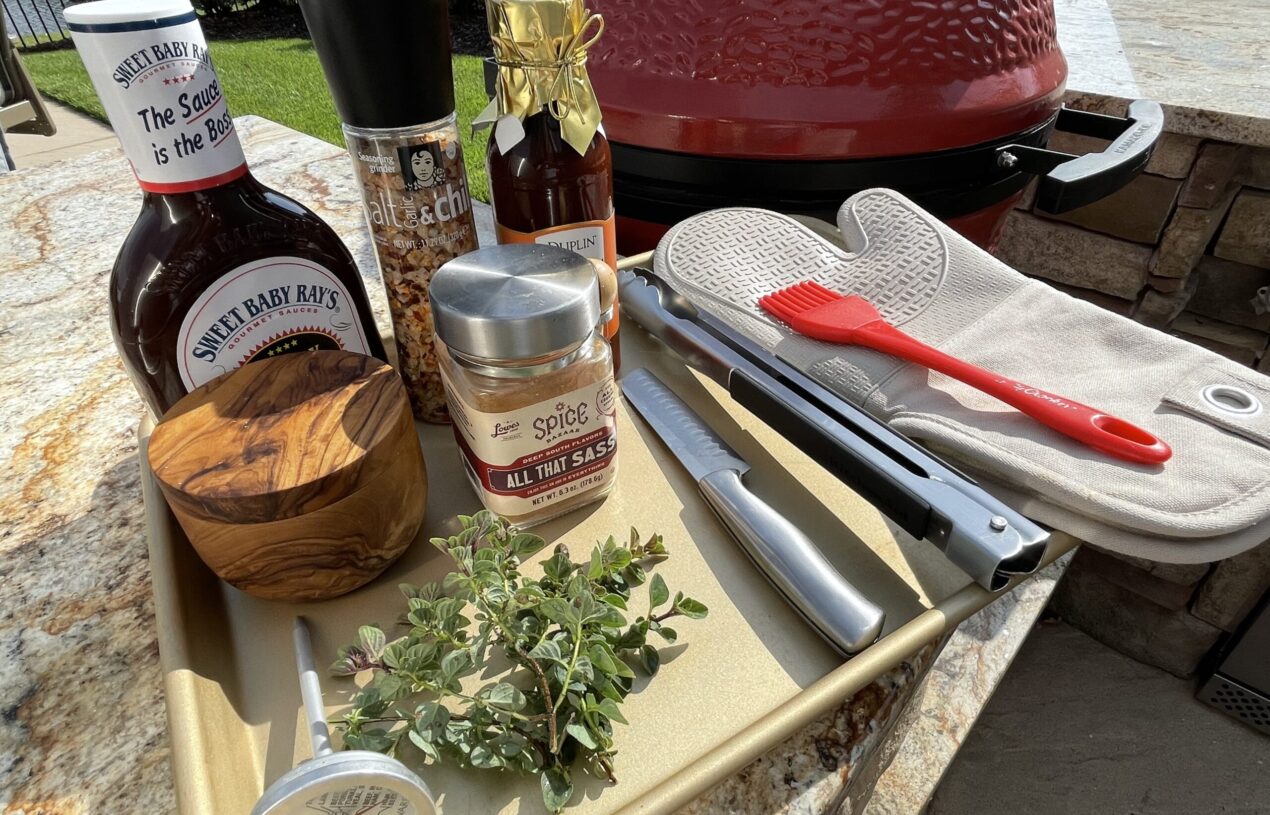
#4- How to organize your grilling tools and spices?
How many times do you find yourself running in and out of the house to grab something you forgot while grilling dinner? It’s like a revolving door. Whoops, forgot the barbecue sauce! Oh no, I need a pair of tongs.

Here’s a simple solution. Use a baking sheet to organize your grilling tools and spices. Everything can be placed on the sheet pan, from spices to a meat thermometer to fresh herbs and more. It is the best way to get items you need to your outdoor grill without spills. (Remember to save space on the tray for a beer, we are talking about grilling, right?!) And clean up is a breeze, since you can put everything back on the tray and get it easily to the sink inside.
#3- How to make Herbed Butter?
Whether I’m cooking vegetables on the grill, roasting them in the oven or in a skillet on the stove, I like to use compound butter. Butter that is flavored with herbs and spices and rolled into a log and frozen can be a real time-saver when grilling vegetables and meats.

Simply place a stick of softened butter in a small bowl and add garlic, spices and herbs. There are lots of different options based on your preferences, liked Zesty Italian Butter or Ranch Butter. Then, place the butter mixture on parchment paper and roll it into a log. Pop it into the freezer and cut off a slice each time you grill or sauté some veggies or meat. Herbed Butters are a flavorful additional to any meal and make meal prep so much easier.

#2- How to soften butter in a hurry?
Inevitably, I decide to bake something at the last minute and I don’t have softened butter. This trick is a great way to get your butter ready when you need it. I’ve used this tip for years and it really works!

Take a stick of butter out of the refrigerator and cut it into 32 small cubes by cutting it in half lengthwise and then cut each of those pieces lengthwise. Now cut across all four sticks 8 times. It only takes a few minutes with a sharp knife. Let the tiny cubes of butter sit on the butter wrapper on the countertop while the oven is preheating and you are gathering the rest of your ingredients, about 10 minutes. Because you are increasing the surface area of the butter, it will soften more quickly. By the time you are ready to use it, it will be soft enough to incorporate into your recipe.
#1- How to juice a lemon?
Lemons are used in many recipes to brighten flavors and keep your meals tasting fresh. I always keep lemons on hand for use in drinks, dishes and desserts. It’s important to get as much juice as possible from your lemons. Here’s how to do it.

Have you found yourself struggling to get every last drop of lemon juice for a recipe? It easier when you do these two things. First, place the lemon in the microwave and heat it on high for 20 to 30 seconds. This is important if your lemon isn’t at room temperature. It warms the lemon and make it easier to squeeze. Second, roll it on the counter under your hand while pressing gently. This is key to breaking some of the membranes inside the lemon and loosening the juice.

Next, cut the lemon in half and use a fork or a hand juicer to twist the flesh on the inside of the lemon. You’ll be shocked at how much juice comes from just one lemon! PS- If your recipe also calls for lemon zest, you’ll want to zest your lemon before cutting and juicing it.
I hope these 10 Best Kitchen Hacks help you in the kitchen while making your favorite dishes and desserts. Saving time and money is what we all strive to do. Remember to share YOUR best tips and tricks in the comments. I look forward to hearing about your successes!